The Visual Guide to Lockpicking by McCloud
Ref: Mark McCloud (Jan, 2007). Visual Guide to Lockpicking, 3rd Edition. Standard Publications.
__________________________________________________________________________________
Summary
The definitive guide for learning the art of lock picking.
__________________________________________________________________________________
Warded Locks
Warded Lock: Found on cheaper padlocks, furniture, handcuffs, and luggage. There will be no pins of wafers visible when looking inside the keyway.
Wards: Obstructions that get in the way of any key other than the correct ones.
Picking Warded Locks
All you need to do is move the locking bolt.
The best way to pick a warded lock is to have a collection of skeleton keys for the various types of warded locks. Try each one in your set on the lock. Insert the key as far as you can and attempt to turn it. If it doesn’t work, try moving it around slightly, and then move on to the next one.
Handcuffs: Use warded locks; The key must be first rotated in one direction and then the other to completely open the cuffs. The first turn disables the double locking mechanism; the other direction disengages the ratcheting mechanism and allows one to swivel out of the wrist clasp.
__________________________________________________________________________________
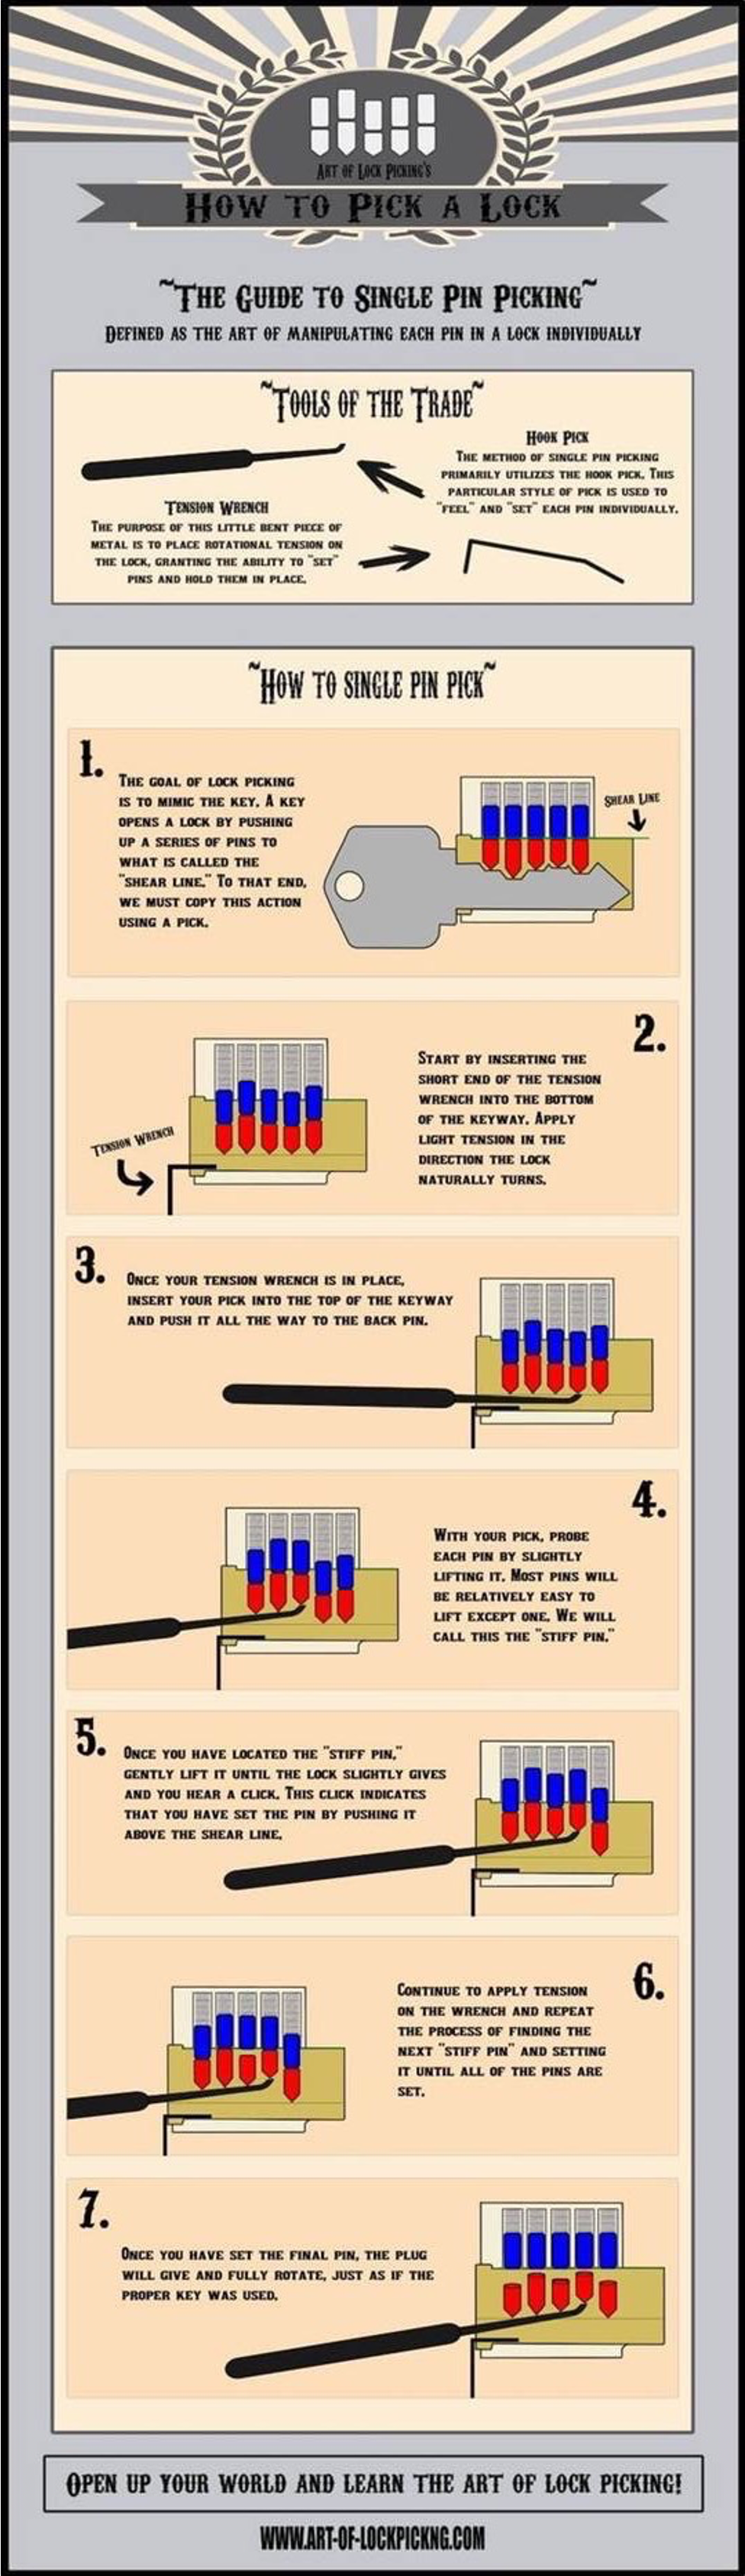
Pin Tumblers
Pin Tumblers: Pins are often round and somewhat pointed at the end. The pins are spring-loaded and will spring back down when you push up on them.
Torque Wrench: Used on Pin Tumblers to apply a rotational force on the plug.
Picking Pin Tumblers: All you really need is a torque wrench and a hook pick.
Raking: First, place a torque wrench into the lower portion of the keyway. Make sure there is plenty of room left to maneuver the pick around the pins. Now apply a gentle amount of turning force on the wrench in the direction that the key would turn when unlocking the lock. Usually, the amount of force applied is much less than what you might imagine. While you are applying this slight force on the torque wrench, put the raking pick all the way to the rear of the keyway. Apply a gentle force up and into the last pin. Now, remove the rake while continuing to apply a slight, constant force on all of the pins. With each pass of the pick, slightly increase the amount of force on the torque wrench. Control the forward and backward motion with two fingers and the force being applied with a third.
Picking: A technique used in which you try to set each of the pins individually. First, use your pick to determine which pin is binding. You can now use your pick to push up on that pin. As you push up on the bottom pin, it will, in turn, push up on the top pin, until you get to the point where the top pin is completely inside the hull and past the shear line. Since you are still applying a slight rotational force, the plug will start and continue to rotate, until it hits the next top pin and stops again. Now, repeat. When you are pushing up on the pins, you have to be finely tuned to feel just the right point when they set.
Binding: Occurs when a rotational force is applied to the plug, while you try to rotate the cylinder with your torque wrench. The plug and the hull essentially crimp the top pin.
Shimming: Similar to bypassing, except that you are bypassing the locking bolt from outside the lock instead of from inside the lock. Shimming is very effective on common door knobs. One side of the latch is angled so that the door can be closed without turning the handle.
Vibration Picking: One of the fastest ways to pick a lock; A tool with a rake pick rapidly oscillates over the pins. This movement causes the pins to be violently vibrated up and down with the hope that at some point the shear line will be clear and the plug may rotate. An appropriate amount of torque is applied while the pins are vibrating to catch them as they set.
Impact Picking: One of the fastest ways to pick a lock; Impacts the tips of the bottom pins with just enough force to knock them into the top pins, thus knocking the top pins up into the hull. The lower pins themselves stay down, because they transferred all of their energy into the top pins.
Pick Gun: Place it in the keyway, pull the trigger, and rotate your torque wrench at just the right time. You must be sure to make contact with each of the pins. When using an impact tool, make certain that you impact the center of each of the pins exactly straight on and at the same time. This means the blade must be exactly parallel to the keyway.
__________________________________________________________________________________
Tubular Locks
Tubular Locks: Locks in which pins are arranged in a circle with all key pins facing out. This means that, instead of a long key with notches of varying depths, it uses a round key with notches of varying depths. There are 4 types: 7 pin center, 8 pin center, 7 pin left offset, and 7 pin right offset.
Picking Tubular Lock: Establish the spring strength required, Insert the pick without applying any torque, once all the way in, apply slight rotational torque and slide the tool in and out. Slide it out only as much as the deepest possible key pin length or key notch depth. Continue applying the turning tension the entire time and be careful not to turn too hard or soft. The turning tension will cause one of the pin columns to bind. If the turning tension is just right, then you can still push the binding pin into the lock with the feeler and the spring can still push out.
__________________________________________________________________________________
Impressioning Tumblers
Grip the blank firmly with the vice grip.
Insert blank carefully into lock.
Rotate Blank Firmly
Move blank upward to mark.
Rotate the blank the other way
Move key upward to mark.
Round marks made by pins and stripes made by wafers.
File straight and then create slopes
Notch too high- bottom pin binds mark. Mark is made.
Notch just right- no pins bind. No mark.
Notch too low- top pins bind. Mark is made.
__________________________________________________________________________________
Combination Padlocks
All combinations are right-left-right.
You must initially turn the dial CW at least 2 full rotations to the right.
The second number in the combination will be at least one full turn to the left past the first number, and at least four numbers less than the first number.
The third number will be less than one full turn to the right of the second number. It will usually be at least four numbers less than the second number.
The combination of numbers will usually be low-high-low or high-low-high.
Once you have stopped at the second number and started to rotate back to the right, you can begin pulling out on the shackle (to locate the third number or final gate) without disrupting the position of the first two wheels.
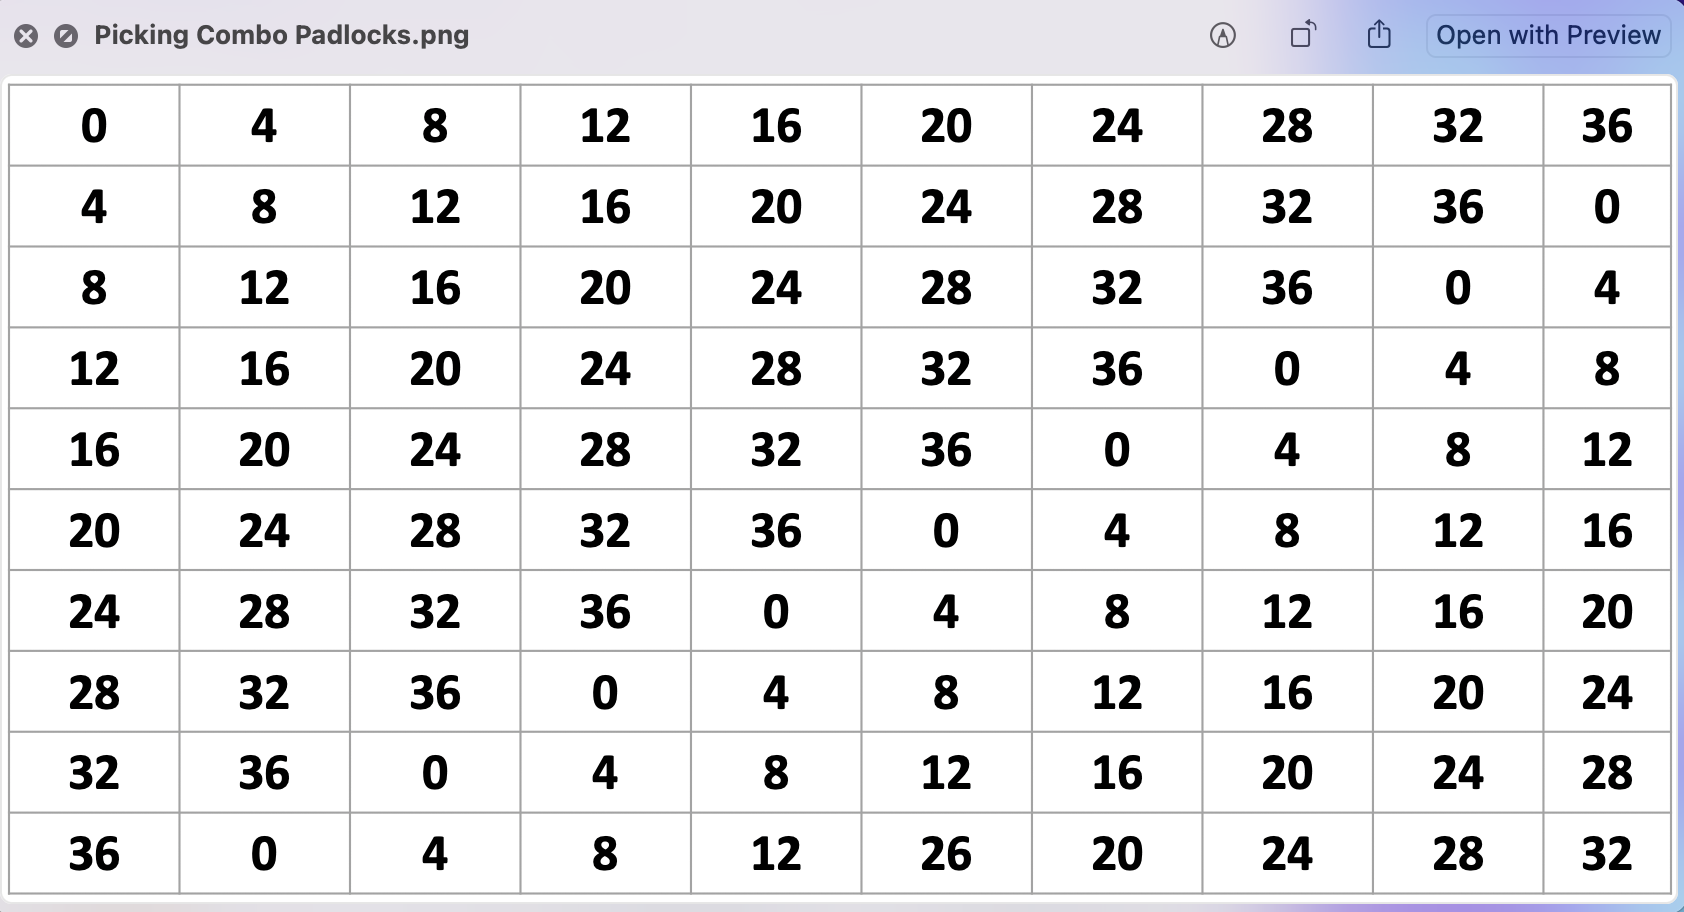
Picking Combination Padlocks
Determine the gate center locations and record them.
Complete the table (First combo options go in the first row).
Tentatively cross out the first and last two rows.
Start plugging in the first and second numbers on the table.
Pull out on the shackle at every gate all the way back around the dial to determine the third gate.
Continue this process down the column.
Continue this process with a new first number if it fails to open.
If it still fails to open after attempting all numbers in the most probable range, extend the probable range to include those numbers tentatively crossed out earlier.
__________________________________________________________________________________