Be Expert with Map and Compass by Hjellström
Ref: Björn Hjellström (2009). Be Expert with Map and Compass. Wiley Publishing.
______________________________________________________________________________
Summary
The Basics of Map and Compass Orienteering.
3 important navigation questions…
From what direction will I attack the control?
What guidance by landmarks will I have in reaching it?
What obstacles will be in my way?
______________________________________________________________________________
Geography
Meridians: Lines of Longitude that run from pole to pole; 0° Longitude is at Greenwich.
Parallels: Lines of Latitude run around the globe; 0° Latitude is at the Equator.
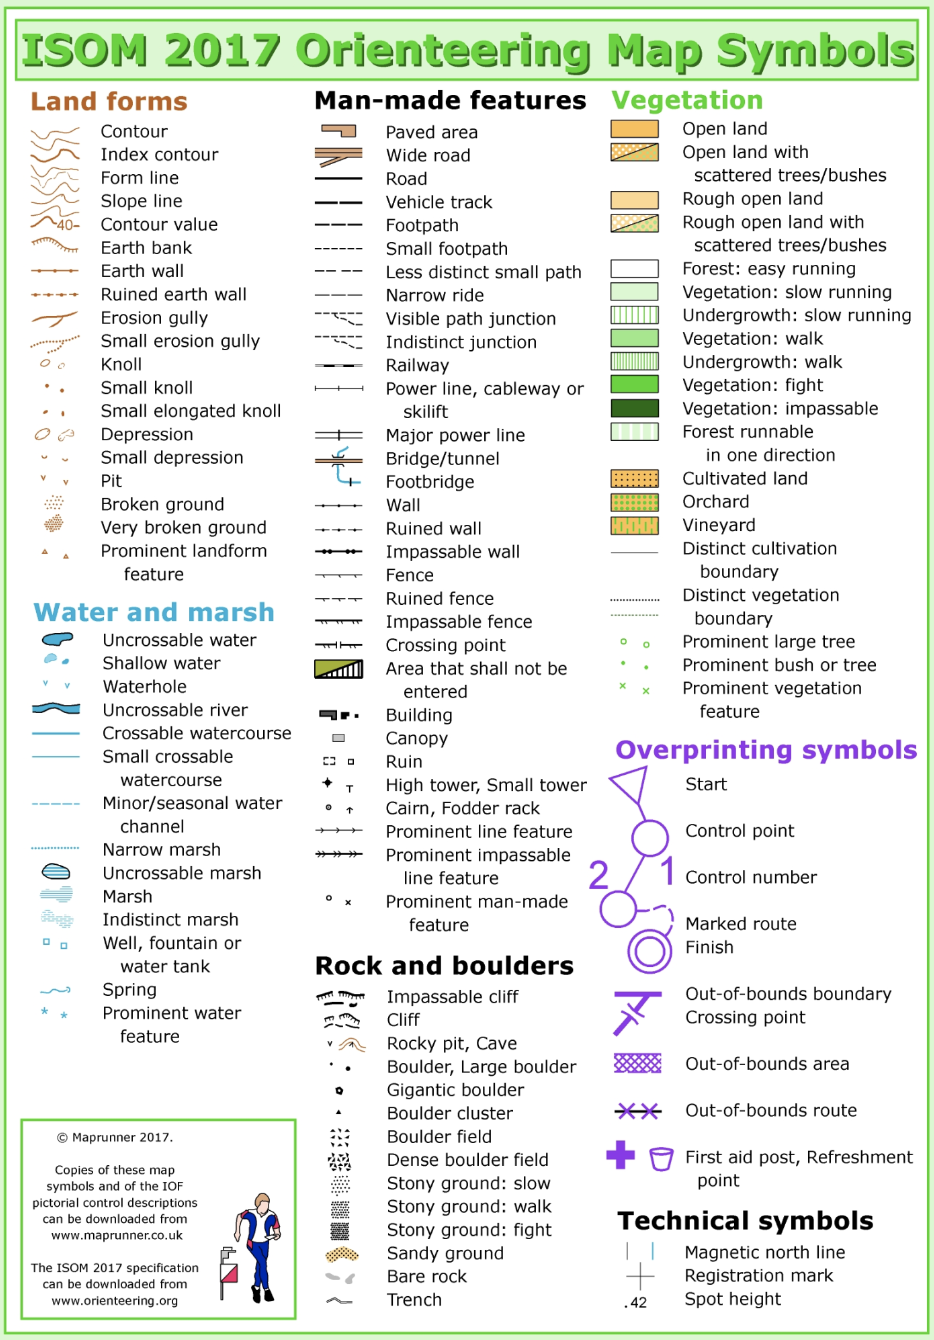
Contours: Lines of equal altitude
When contours lines cross a river or a stream, they take on a V shape, with the point of the V pointing uphill; when they denote a spur or the ridge of a hill, they become U-shaped, with the bottom of the U pointing downhill.
Depression: a low point in the ground, surrounded by higher ground, shown on a map by one or more closed contour with small ticks- hachures- pointing downward from the contours.
Hill: an elevation shown by two or more closed contours.
Hilltop: the actual top of a hill, indicated by at least two closed contours.
Knoll: A very small hill shown by a single brown dot.
Pass: A passable depression between two large hills or mountains.
Pond: A small body of water < than 25 yds across.
Pulpit: a projection from a hillside, shown by a contour kink.
Ravine: a narrow, steep-sided valley, shown by close parallel contours.
Reentrant: A minor side valley off a main valley, shown by one or more V-shaped contours.
Ridge: The elongated spine of a hill, shown by one or more long, closed contours with almost parallel sidelines.
Saddle: a saddle shaped dip between two hills or in the crest of a ridge.
Spur: a minor ridge jutting out from a main ridge and generally flanked by reentrants, shown by one or more U-shaped contours.
______________________________________________________________________________
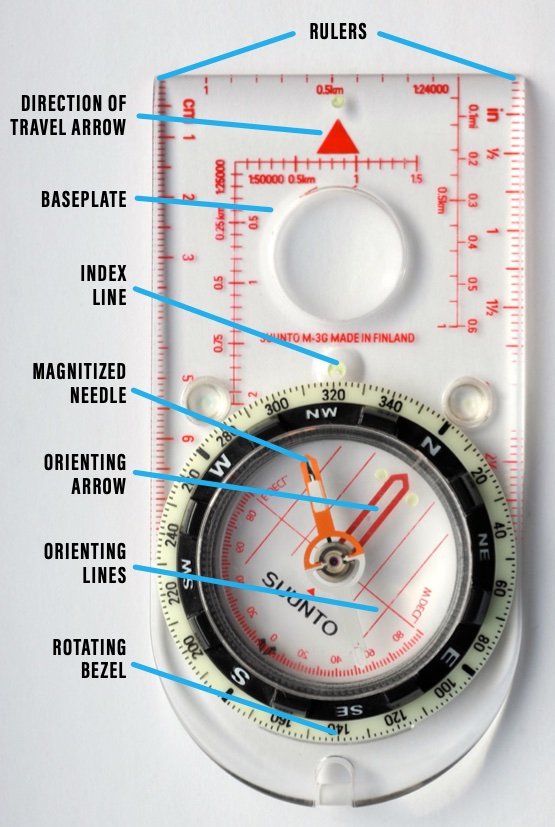
Compass Setting
Set your Declination (Add West, Subtract East).
Example: Let's say you live where the Declination is 18E. You set your compass for a certain direction on the map and get a reading of 144. You subtract 18 from 144 and get 126. You reset your compass to this new number (126) and are ready to proceed.
Place the base plate on the map in such a way that one edge of it connects start with destination.
Turn the housing until the orienting arrow lies parallel with the nearest meridian. The compass is now set.
Whenever you need new bearings for your travel, simply open up the map to that part containing the stretch of the route directly ahead of you. Then transfer the direction you want to follow from the map to your compass. In this way you keep directions of map and compass coinciding as you proceed.
______________________________________________________________________________
Map/Compass Navigation
On the map, line up your compass with your route.
On the compass, Set housing to direction of your route (via magnetic north).
In the field, follow the direction set on the compass.
______________________________________________________________________________
Orienteering
Find your exact location on the map.
Find the exact location on your map of the point to which you are to go and check the general direction to it.
Draw in a beeline from the place where you are to the point to which you want to go.
Decide on the most efficient route.
Set the compass correctly for cross-country travelling.
Jot down the time you set out from one point to the next.
Closing in on a route- broken down into the green, yellow, and attack (red) sections:
Green (rough orienteering): This is the first part of the leg that takes you from your present location toward a catching feature or along a handrail in the direction of the next control or checkpoint along the route. To cover this stretch you will use rough orienteering and run at full speed.
Yellow (standard orienteering): You have reached the catching feature and now have to locate the attach point that will bring you close to the next control. You keep a fairly good speed and go in for standard orienteering by map and compass, keeping track and distance travelled.
Red (precision orienteering): The final part of the leg, from attack point to control, requires precision orienteering: exact map reading, precision setting and following of compass, accurate measuring of distance on map with accurate pace count to match.
______________________________________________________________________________